Userid Management
The user ID management screen is to create different users under user profiles. These users (belonging to specific user profile) will have privileges /access to various forms/widget in the user panel as setup to its associated user profile in the user profile rights screen. Based on the Operational business segment (OBS) and branches linked to these users in this screen, the user will be able to initiate credit application under respective branches and OBS only.
Creation of User Profile and Users in Spotlight
- The spotlight users can create user profiles(roles) and user Id(users) required for CLOS from Key cloak and Spotlight platforms.
- All created user profiles (roles) and user Id(users) in the spotlight with Permission "CLOS Admin panel Configuration" can login to the CLOS admin and CLOS user panel and these users and user profiles display in the CLOS screens (User Profile and User ID Management Screen). These user profiles/users are stored in the respective CLOS tables (User Profile and User ID Management tables) so other dependent screens which validate User Profiles or User IDs through these CLOS tables work as expected.
-
CLOS Admin users will be able to login to CLOS Admin (Spotlight) but will not be able to navigate to CLOS User Panel. i.e., When CLOS Admin user clicks on "CLOS User Panel" (the deeplink url) from spotlight, admin user should not be able to view CLOS user Panel Dashboard.
- CLOS Admin users will be able to login to CLOS Admin (Spotlight) but will not be able to navigate to CLOS User Panel. i.e., When CLOS Admin user clicks on "CLOS User Panel" (the deeplink url) from spotlight, admin user should not be able to view CLOS user Panel Dashboard.
- The functionality to add a User Profile Type to User Profiles created in the spotlight in CLOS Admin screen, facilitates the CLOS admin users to subsequently link the created user profiles to the respective User Profile Types within the User ID Management section >User Profile.
- The users navigate to the CLOS Admin Screen: User ID Management > User ID Management screen and edit each record to update other Basic User Credential details, User Profile Rights, Business Hierarchy Rights, Branch Rights, etc) for each user created from the Spotlight and Keycloak. The CLOS admin user cannot edit the data fetched from Spotlight (like Login ID, User Title, etc).
- The users navigate to the CLOS Admin Screen: User ID Management > Credit Committee Creation screen and can add/edit/delete each record.
- The CLOS User Panel and CLOS Admin App DB validate the user permission based on the logged details of the customer.
- Implementation of the Single Sign-on (SSO) feature is essential for CLOS Users, ensuring seamless auto-login functionalities across both Spotlight and CLOS User Panel and admin panel platforms.
- If the User is associated to multiple Roles, CLOS defaults to one of the role.The CLOS admin user is allowed to change the default from User ID Management in CLOS.
- The CLOS non-admin users (users associated to roles other than administrator) navigate to the CLOS admin configuration screens and have only view access across all the admin screen.
- The CLOS admin users (users associated to Role - Administrator) navigate to the CLOS admin configuration screens and have add/edit/view/delete access across all the admin screens.
Runtime parameter is setup as Spotlight/Key Cloak:
If the runtime parameter is setup as Spotlight/Key Cloak, the Add User and Delete button do not display in the view page of User ID Management > User ID Management since user creation is now managed by Spotlight. Edit Button is enabled.The admin user can edit other details of the user profiles except the mapped data (First Name, Last Name, email ID and linked Roles).
Runtime parameter is setup as CLOS DB:
If the runtime parameter is setup as CLOS DB, the add user and delete button display in the User ID Management > User ID Management.The admin user can add ,edit and delete user.
View
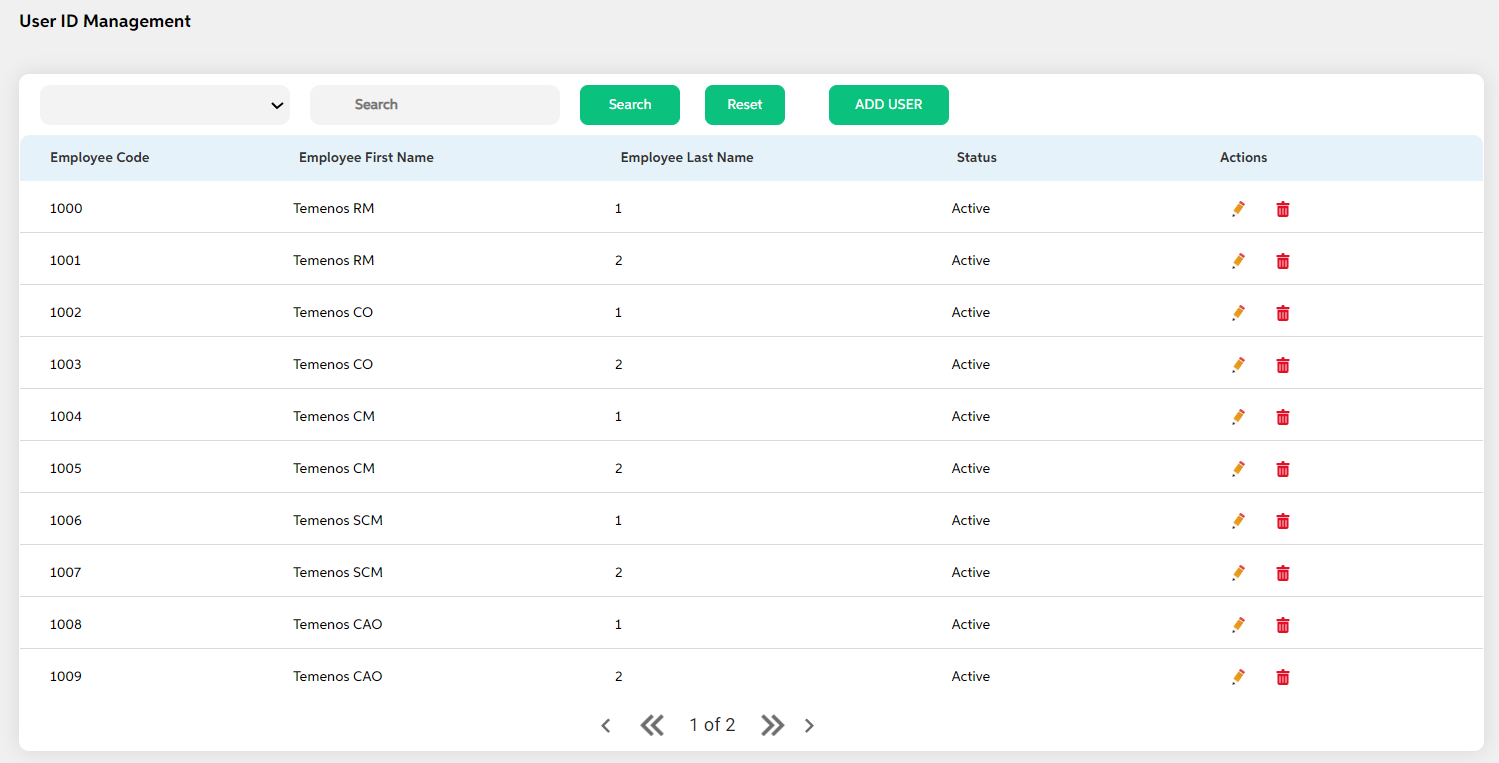
After selecting user id management from the user id management module, the User lands on the screen where the user can view the already existing users with a search option and add a user button.
User can view the below details of the already added users
- Employee Code
- Employee First Name
- Employee Last Name
- Status
- Actions (Edit, Delete)
Search criteria for the user id management are as follows:
- Employee First Name
- Employee Last Name
- Status
- User Profile
- User Profile Type
The user can click on the reset button to erase the search criteria given.
Add
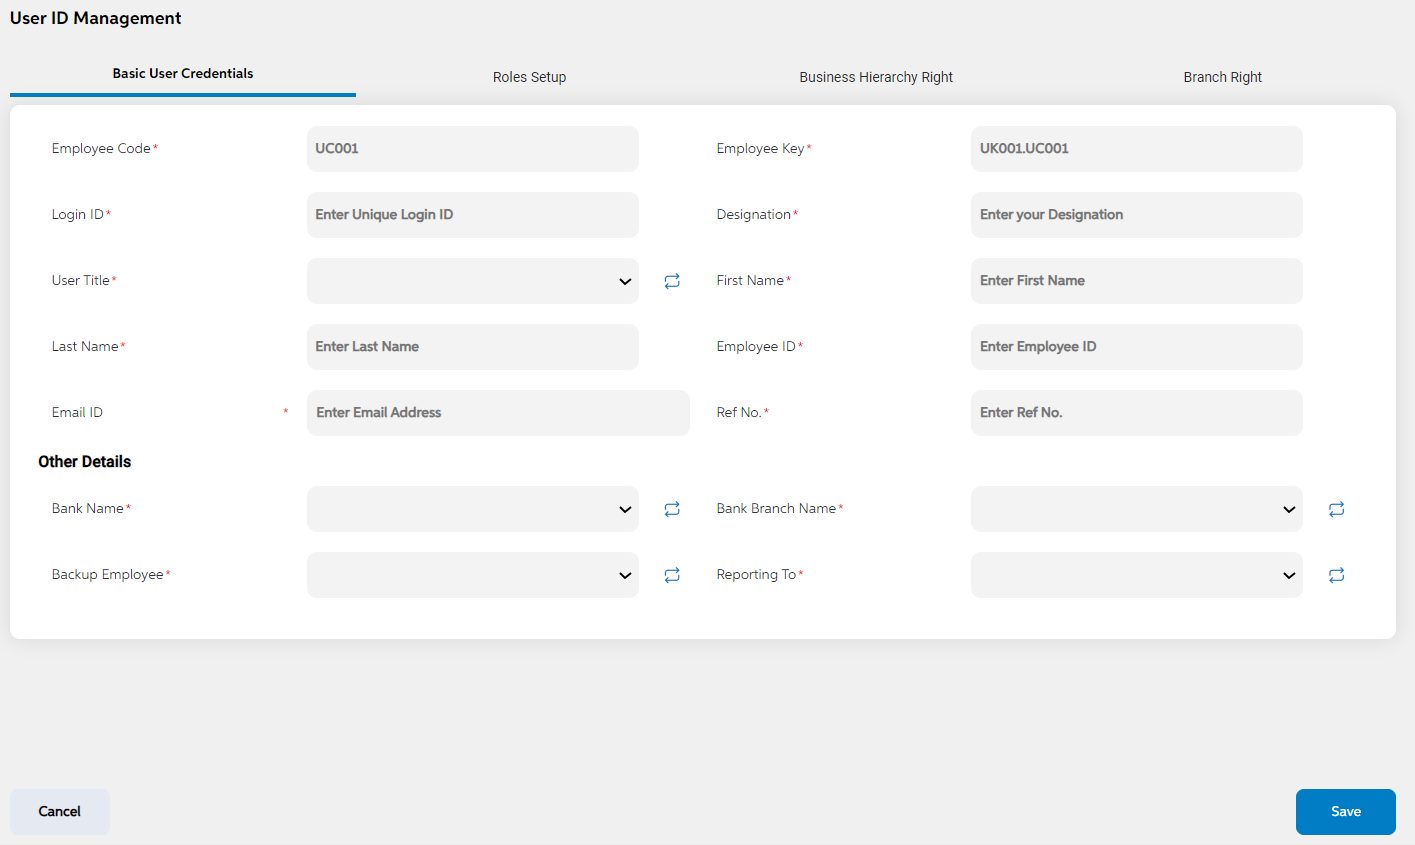
The user can click on the add users button It navigates the add user page which contains four sections such as,
- Basic User Credentials - To define the basic details of the user such as first name last name email ID etc
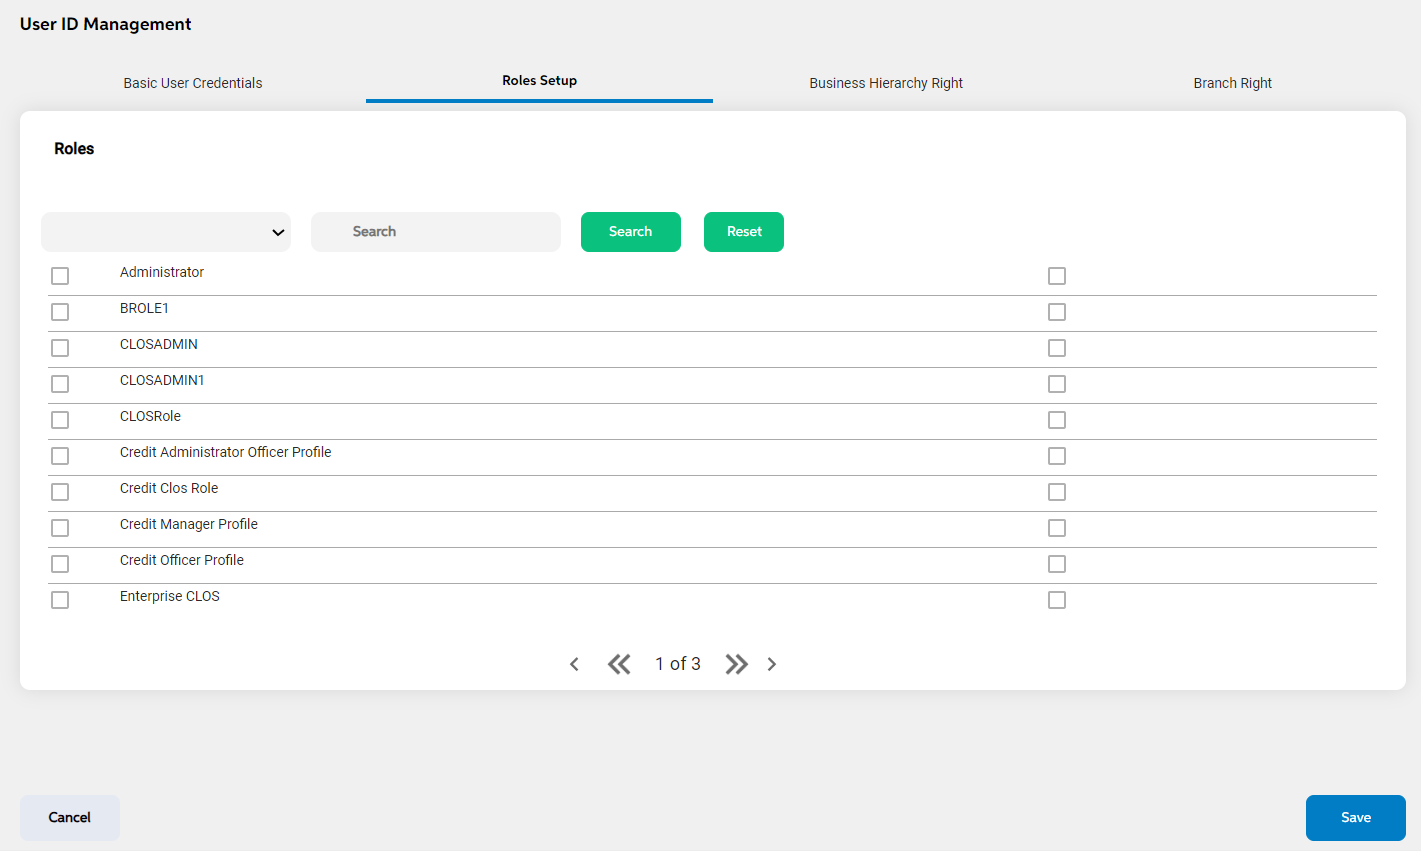
- Roles setup - To map the users to a user profile as default and it also has the option to give rights to other user profiles. Thus, User can have one user profile by default and can have rights/access to other user profiles.
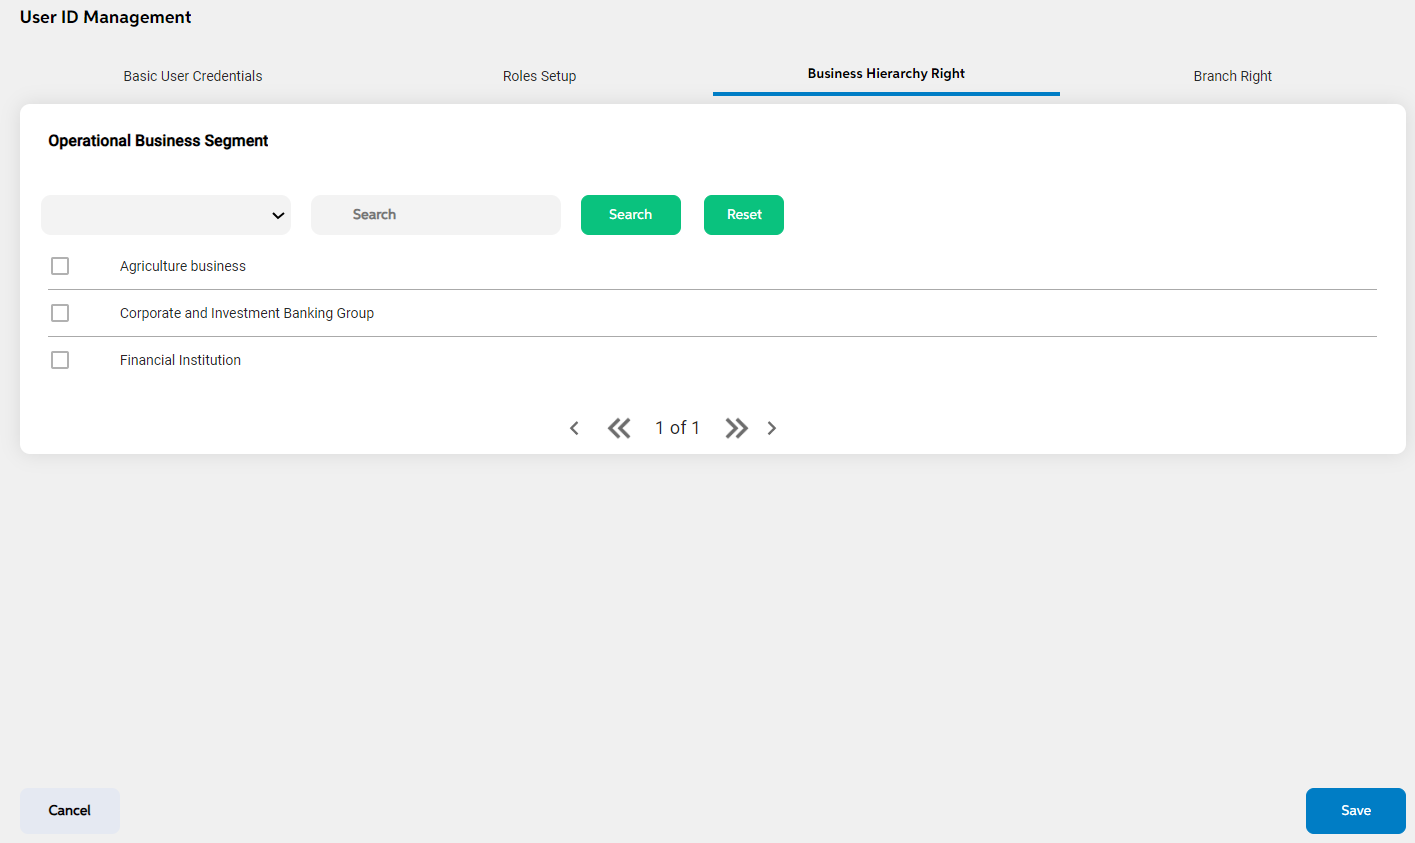
- Business Hierarchy Right - To define the operational business segment rights for the users. Based on the rights given, User will be able to work in its respective business segments.
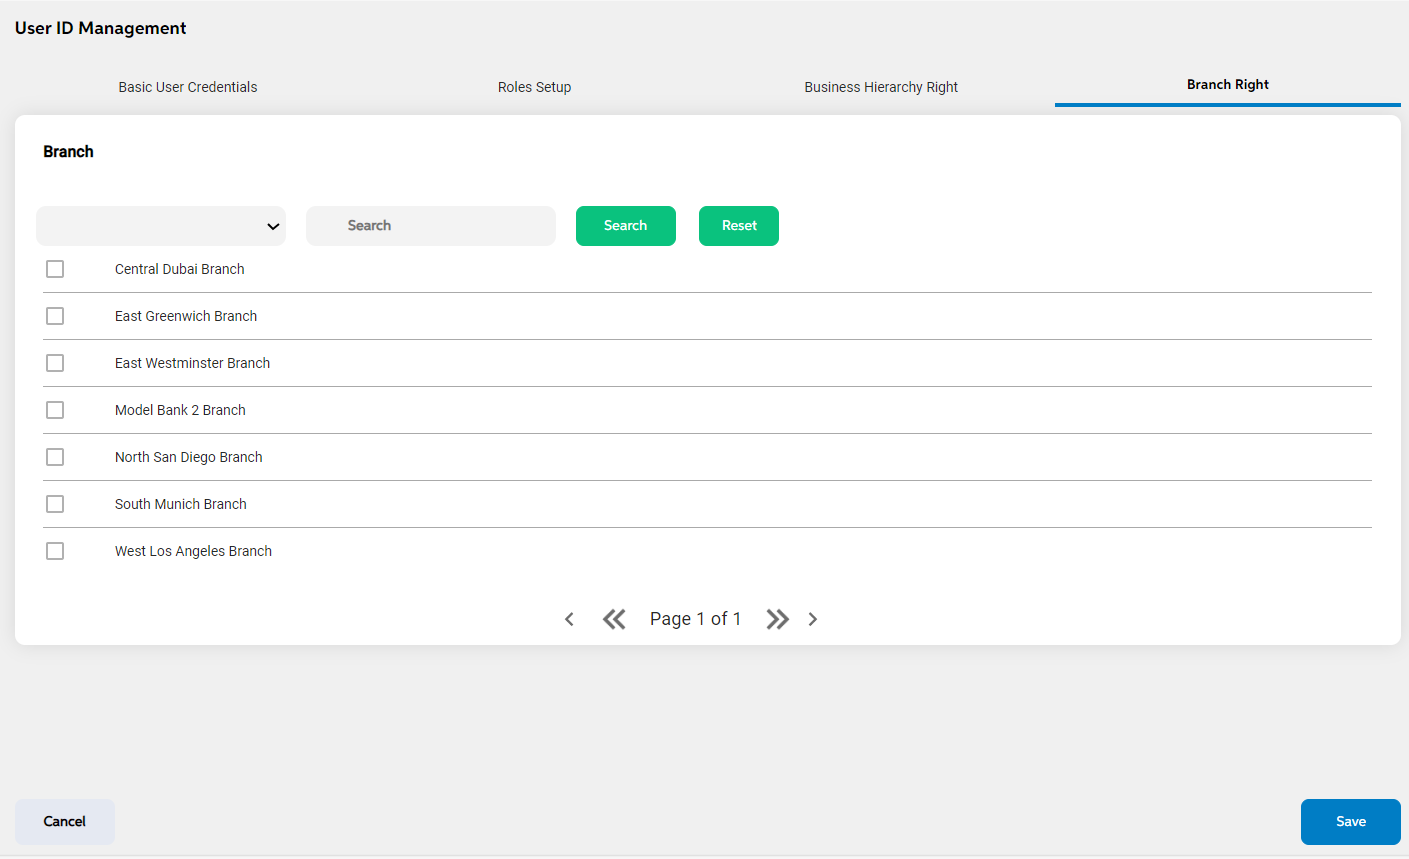
- Branch Right - To define the branch for the users. Based on the rights given here, user will have access to those branches. If rights are not given then user cannot view those branches in branch field in borrower information.
If the runtime parameter is setup as Spotlight/Key Cloak:
If the runtime parameter is setup as CLOS DB:
Below are the field details:
| Screen name | Field name | Description | Mandatory/non mandatory | Field type |
|---|---|---|---|---|
| User Id Management (Basic Credentials Setup) |
Employee Key |
This is the scorecard name which will be mapped to a grade setup. | Mandatory | Auto-populated |
| Employee Code | A brief description about the scorecard | Mandatory | Auto-populated | |
| Login ID | This field is to map a score card to rating model | Mandatory | Dropdown | |
| Designation | Status is to mention if this is active or inactive. If this is marked as inactive, then it will not appear in the respective screens. | Mandatory | Dropdown | |
| User title | User title | Mandatory | Dropdown | |
| First name | First name of the user | Mandatory | Alphanumeric | |
| Last Name | Last name of the user | Mandatory | Alphanumeric | |
| Employee Id | Employee id of the user | Mandatory | Alphanumeric | |
| Email Id | Email id of the user. This email id is used to send email notification as configured if any. Ex: sending user ID and activation link to the user to activate and change password. | Mandatory | Alphanumeric | |
| Ref No | Reference number | Mandatory | Alphanumeric | |
| Bank Name | Bank Name | Mandatory | Dropdown | |
| Bank Branch Name | Branch Name of the bank | Mandatory | Dropdown | |
| Level | Level | Mandatory | Dropdown | |
| Backup Employee | Backup employee of the added user | Mandatory | Dropdown | |
| Reporting to | Reporting to | Mandatory | Dropdown | |
| User Id Management (User Profile Setup) | User Profiles | Contains the list of user profiles added in the user profile setup admin panel screen (Only one user profile can be by default and other can be selected just to give access rights) | Mandatory | Checkbox (multi-select) |
| User Id Management (Business Hierarchy Right) | Business Hierarchy | Contains the list of business segments added in the operational business segment admin panel screen | Mandatory | Checkbox (multi-select) |
| User Id Management (Branch Right) | Branch Right | Contains the list of the bank branches added in the branch admin panel screen | Mandatory | Checkbox (multi-select) |
Edit
The user can edit the details of the already added users by clicking on the edit icon under the actions tab on the view page. It lands in the same add users page with prefilled details. Users can choose to make the changes and click on save.
Delete
AN user added can never be deleted. He/she can only resign. If a user resigns the bank then the user can click on the delete icon under the actions tab. The user views a pop-up for confirmation “Are you sure you want to delete it”. If clicked on yes, then the status of the user becomes resigned.
Prerequisites Configuration
| Screens to Configure (as Pre-requisite) | Screen name | Reflection in user panel | Reflection in admin panel |
|---|---|---|---|
The above screens act as prerequisite screen for user ID screen |
User Id management | Used in both the user panel and admin panel |
User ID screen acts as pre requisite for the below screen
|
In this topic